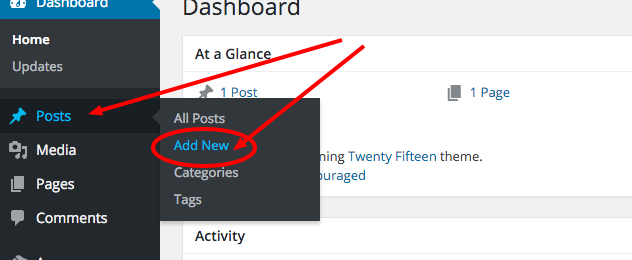
If you’re familiar with standard word processing software, adding and editing posts and pages will be a breeze with the visual editor. Begin by going to Posts or Pages depending on what content you’d like to create, and click Add New. Chances are, your website has been heavily customized and adding a new page should be left to programmers, so if you’d like to edit content on an existing page, simply go to pages and navigate to the page you’d like to edit.
Visual Editor Tools
The main area shown below will be used to edit and add content on your website.
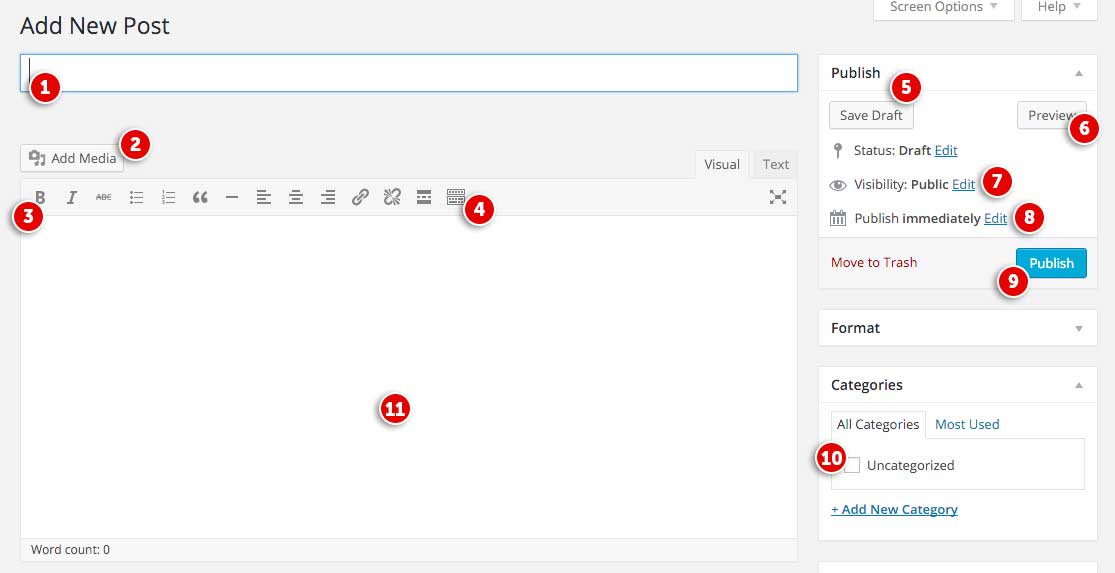
- Post or page title – use a descriptive, but concise title to direct users to your content.
- Add Media – This will open your Media Library where you can upload or select images, PDFs, and other documents to insert into your content.
- Text editing tools – Similar to word processing software, these tools will control your content styling. Keep in mind that what you see in your visual editor will not match what’s on your live website. This text will run through styling that’s been setup specially for your website by Revel. Some of these items may not function with the template created for you – contact Revel with any new items needed.
- Toggle toolbar options – This is an important button that will display additional text styling options. See below for a description on what these items control.
- Save Draft – Under the Publish dialog you have several options in saving and posting content. Save Draft will save a version of whatever content you’re working on without posting it live to your website. This will be a useful button to save your progress and come back to editing at a later time or date.
- Preview – This will present a preview of what your content will look like live on your website. Some custom items may not work with this feature, but anything created in the main visual editor will.
- Visibility – By clicking Edit next to visibility, you can password protect a page or make it private so that only admins of your CMS can see the page.
- Publish date – Click Edit under Publish Immediately to change when your post or page should be made live. You can choose a future date and it will automatically post at that date and time without any more work from you. This is useful if you’d like to create several posts at once and have them become live on your website at different dates. You can also postmark a post if you’d like it to appear as though it was posted at a past date.
- Publish or Update – If this is a new post, you’ll see a blue Publish button. This will make your post live, or set it to go live if you’ve chosen a future publish date. If you’re editing and existing page or post, you’ll see a blue Update button to save your changes to the live version.
- Categories – Depending on the template that was designed for you, it may utilize categories. Check a category that applies to your post or create a new one by clicking “Add New” at the bottom. These categories will inform your users what the post relates to and group together similar posts for easy navigation. It’s important to be broad with your categories so that you can place multiple posts in a category.
- Text editor – This is the field where you’ll place your content. If you’re copying and pasting content from another word editing software or website, it’s important to strip any pre-set styling and re-apply the styling with the tools in this visual editor. For example, bullet points created in Microsoft Word may not look or function the same as bullet points setup in the visual editor. Revel will train you on how to strip that formatting, see your account manager for a refresher. It’s highly recommended you produce content directly with the visual editor.
Tool Functions
There are two (2) rows of editing icons contained within the visual editor. You can find out what any icon means or does by hovering over it with your mouse – a small tooltip will appear describing the icon and its purpose.
Row 1
When initially opened, the visual editor will display a single row of icons:

- Bold
- Italic
- Strike-through
- Unordered list (bullet points):
- Item 1
- Item 2
- Ordered list
- Item 1
- Item 2
- Blockquote (a way of displaying quoted text; each theme will style this differently.)
Always forgive your enemies; nothing annoys them so much.
- Horizontal line
- Align Left
- Align Center
- Align Right
- Insert/edit link
- Unlink
- Insert More tag – used to determine where a post truncates, not all themes use this.
- Proofread/Spell Check
- Toggle Distraction Free Writing
- Toolbar Toggle (enables the second row of editing icons)
Row 2
To display the second row of icons, select the toolbar toggle icon ![]()

- Style – Various formatting styles defined by your theme. See Revel for training on when to use different styles.
- Underline
- Justify
- Select text color – Change the text color. Your theme will likely overwrite this to keep a consistent look and feel throughout your website. This item shouldn’t be used.
- Paste as Text – Use this to help with stripping formatting when copying text from elsewhere.
- Clear formatting
- Insert special character
- Outdent – move text further left
- Indent – move text further right
- Undo – undo your last action
- Redo – redo your last action
- Help – display some information about using the editor, as well as keyboard shortcuts.